2: Loading Specific Data to the Minimongo
Before doing our queries and mutations with GraphQL, we’ll first load fewer data to the Minimongo and the rest of the data we’ll fetch with GraphQL later.
2.1 Meteor Livedata
Meteor is great to use with reactive data. That’s why it’s so easy to create an app like our to-do that exchanges data between client and server without any problems in a fast way. But, when our app starts to scaling up and having more live queries in the servers due to many subscriptions, the application server can consume more memory and maybe you don’t need real time updates everywhere.
That doesn’t mean a problem with Meteor. Meteor’s subscriptions are super-fast, but as expected, if you doing more work on the server this is going to demand more from your servers.
2.2 Filtering Data
GraphQL is a different approach of Meteor’s DPP on how to exchange data between server and client, but with Meteor, you can use both approaches together, and this is exactly what we’ll do.
We are not recommending that you remove your subscriptions, the goal here is just to teach you how to do things with GraphQL and Meteor.
We are going to split the solution to use both, using sometimes Meteor built-in features and sometimes GraphQL features.
So, in this step on the Simple Todo tutorial we created a publication that expose all the task data to be used in the client.
We’ll keep using the subscription just to keep track of changes in the state of tasks when they’re finished or not. So, from all that data, we in keep just the props _id, isChecked, and userId.
Go ahead and change the fields published by your Meteor.publish function inside the tasks publication.
import/api/tasksPublication.js
..
Meteor.publish('tasks', function publishTasks() {
  return TasksCollection.find(
    { userId: this.userId },
    { fields: { _id: 1, isChecked: 1, userId: 1 } }
  );
});
Your app should look like this now:
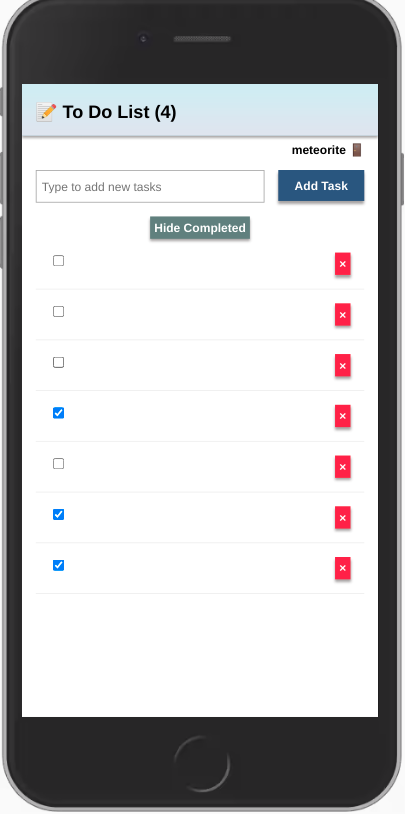
This is happening because we’re not getting the text data anymore. You can check, all the data that you have in the client, on your Minimongo:
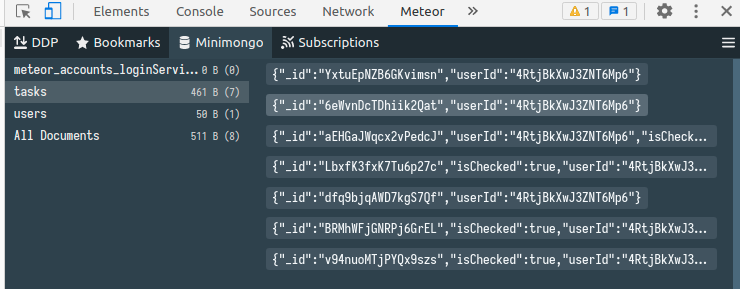
As you can see, we just have what we asked for: _id, isChecked, and userId.
Review: you can check how your code should be at the end of this step here
In the next step we’ll create our first query using GraphQL and then we are going to have our text back in the UI.